Hướng dẫn cách tích hợp Google Authenticator vào sshd trên môi trường OSX. Mục đích ngoài password thường dùng ra thì phải có one-time-password trên điện thoại mới có thể đăng nhập được vào hệ thống.
I was interested in Google Authenticator one month ago, if you don't know what Google Authenticator is, check this description (1):
The Google Authenticator project includes implementations of one-time passcode generators for several mobile platforms, as well as a pluggable authentication module (PAM). One-time passcodes are generated using open standards developed by the Initiative for Open Authentication (OATH) (which is unrelated to OAuth).
Google Authenticate can turn your mobile phone to an one-time-password (OTP) token. That means, beside your own password, you must provide a number from your phone to login to your system.
Some applications have integrated Google Authenticator like Google Apps, LastPass, WordPress... So, I asked myself if i could use it for my Macbook ssh daemon?
After some searches, I understood that Google Authenticator has not supported OSX officially. That's why it can not work with OSX although you can build it successfully. To have some funs, I decided to modify it. You can follow my steps to apply your Linux systems also because it's similar. Let's go:
1. Download source code (2):
You can use hg to grab the source code (3). Type the following command in console:
Code:
hg clone --insecure https://code.google.com/p/google-authenticator/
If you get a certificate problem, try press R to ignore it (to fix this error, please contact Google Security Team :-P). The local source folder will be similar Google lastest repository (4).
2. Edit and compile:
Because of unofficially OSX supported, you can build the source code but you can't use it to login. You will always have this error:
Code:
in _openpam_check_error_code(): pam_sm_authenticate(): unexpected return value 19
A little modification for OSX required (Linux maybe not), edit pam_google_authenticator.c, insert those lines:
Code:
 static int drop_privileges(pam_handle_t *pamh, const char *username, int uid,
 int *old_uid, int *old_gid) {
     // Try to become the new user. This might be necessary for NFS mounted home
     // directories.

     int old_uid1 = setuser(uid);
     if (old_uid1 < 0) {
         log_message(LOG_ERR, pamh, "Failed to change user id to \"%s\"", username);
         return -1;
     }
     return old_uid1;
Exit and execute "make && make install" in console. *Please keep in mind that this is my dirty hack to make it works, it is unsupported and I take no responsibles for this modification*.
As a result, pam_google_authenticator_testing.so is complied.
3. Install:
Copy pam_google_authenticator.so module to PAM folder:
Code:
sudo cp pam_google_authenticator.so /usr/lib/pam/
Add this line to /etc/pam.d/sshd:
Code:
auth required pam_google_authenticator.so
Add this line to /etc/sshd_config:
Code:
ChallengeResponseAuthentication yes
Finally, restart sshd (5) by:
Code:
 sudo launchctl unload /System/Library/LaunchDaemons/ssh.plist
 sudo launchctl load -w /System/Library/LaunchDaemons/ssh.plist
To here, you finished the installation process, we can move to next step: Setup.
4. Setup:
You must install Google Authenticator for your mobile phone, in my case, i used App Store to download and install.
Run the following command in your server console:
Code:
./google-authenticator
Answer "y" for its questions.
That's all for server settings, now, you should look at information Google Authenticator provided, there is a link likes:
Code:
https://www.google.com/chart?chs=200x200&chld=
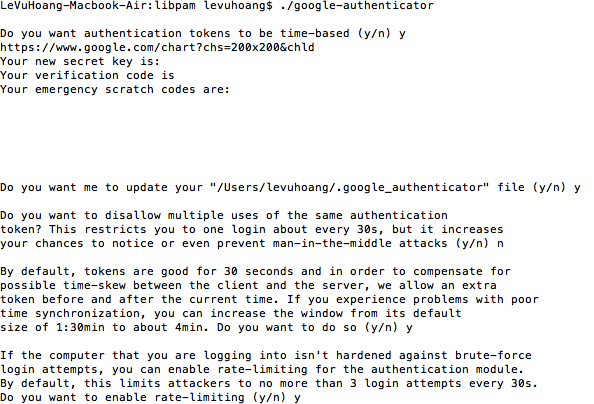
Copy this link and paste it to your browser, a barcode image will appear.
Open Google Authenticator on your phone, press Plus (+) button and move your mobile's camera to capture the barcode image, it will automatically display your own OTP.
It's ok for mobile settings also.
5. Testing:
Try to login to your system via ssh, you will be required for password and verification code.
This is the result:

Two-factors authentication is now enabled.
References:
(1) http://code.google.com/p/google-authenticator/
(2) http://code.google.com/p/google-authenticator/source/checkout
(3) hg client: http://mercurial.selenic.com/downloads/
(4) http://code.google.com/p/google-authenticator/source/browse/
(5) Enable sshd for OSX: go to Apple > System Preferences > Sharing, check Remote Login
No comments:
Post a Comment